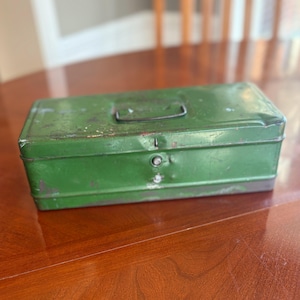
3ds Max Noise Reverence
For a 1960’s metal pencil sharpener, you’ll mainly want three procedural layers:
- Base painted metal
- Paint wear / chips
- Scratches + oxidation
Arnold works best when these are separate masks layered together rather than one big noise map.
Below are some procedural recipes that work well for vintage metalware.
1. Paint Chips (the big worn edges)


This is the most important layer.
Node recipe
aiCellNoise
   scale: 4–8
   jitter: 0.9
   randomness: high
Pipe into
aiRange
   contrast: high
   smoothness: low
Then use as mask in
aiLayerShader
What this does
Cell noise produces irregular paint islands.
Tip
Add a little distortion:
aiNoise → distortion input
scale: 2
This prevents the chips from looking too computer-perfect.
2. Edge Wear Mask


Real wear occurs mostly on convex edges.
Node
aiCurvature
mode: convex
radius: 1–2
Multiply with noise:
aiNoise
scale: 10
octaves: 3
distortion: .2
Combine using
aiMultiply
Result
Paint chips appear mostly on corners and edges, like real objects.
3. Fine Scratches (steel under paint)


Scratches are mostly directional.
Node recipe
aiNoise
type: linear
scale: 200
anisotropy: high
Then:
aiRange
contrast: high
Use as bump map.
Tip
Rotate the UVs slightly so scratches aren’t perfectly horizontal.
4. Rust / Oxidation


Rust appears inside chips and crevices.
Node setup
aiCellNoise
scale: 12
randomness: high
Multiply with
aiAmbientOcclusion
spread: 0.6
This concentrates rust where water collects.
Color
Rust usually ranges:
dark rust   RGB 0.25 0.08 0.02
orange rust RGB 0.5 0.22 0.04
Use a ramp node.
5. Subtle Paint Variation (important)
Even painted metal has uneven tone.
Node
aiNoise
scale: 3
octaves: 4
distortion: .3
Multiply with base color.
Variation should be very subtle (~5%).
Example Arnold Material Stack
Layer 1
Bare steel

Layer 2
Paint

Mask
CellNoise * Curvature

Layer 3
Rust

Mask
AO * CellNoise
Bump layers:
fine scratches
+
micro noise
Steel Base Settings
For a vintage sharpener:
metalness: 1
roughness: 0.25
specular color: slightly warm
Paint layer:
metalness: 0
roughness: 0.4
💡 A small trick used in film assets
Add two different scratch scales:
large scratches: scale 150
micro scratches: scale 800
Mixed together they look far more realistic.
✅ If you’d like, I can also show you a very compact Arnold node network (about 9 nodes) that produces convincing chipped vintage paint without needing texture maps.
It works extremely well for objects like your pencil sharpener and is fast to tweak.